Modding is supported by Gladius out of the box. Modders are free to modify it as they see fit, but the developers would like to note the following:
Bear in mind that Warhammer 40,000: Gladius - Relics of War contains IP owned by Games Workshop, and as a result you should consider a few things when creating mods for this title:
When uploading Warhammer 40,000: Gladius - Relics of War mods to the Steam Workshop, you’ll need to confirm you’ve read the section on Mods in the game’s EULA. This is provided as a pop-up message when you are uploading.
Please ensure your mod meets the requirements laid out in the EULA, especially with regard to the treatment of Games Workshop and Warhammer 40,000: Gladius - Relics of War IP, and ensuring that no third party IP is present.
Do not include or alter content in a way that is offensive or denigrating to the World of Warhammer 40,000.
Please only include Warhammer 40,000 content in your mods – other Games Workshop IP like Age of Sigmar or Warhammer Fantasy Battles is separate and is often licensed to other companies, or used in other games.
It is not permitted to charge or ask for money for your Warhammer 40,000: Gladius - Relics of War mods.
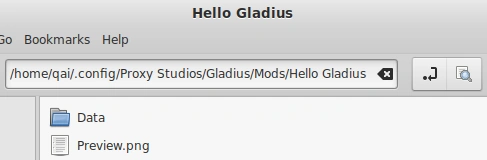
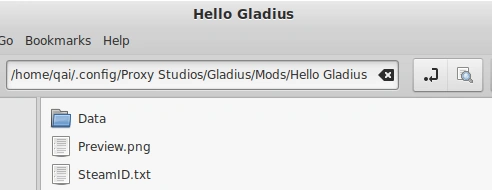
replacing <mod name> with the name of the actual mod. Any mod files meant to replace their original counterparts must be named and placed in the correct directory hierarchy under the Data subfolder in the main <mod name> folder.
In the <mod name> folder, place a PNG image named Preview.png. This image will be used as the Steam Workshop thumbnail. The image should be less than 1 MB in size to ensure continued compatibility with the Steam Workshop platform.
Mod Listing[ | ]
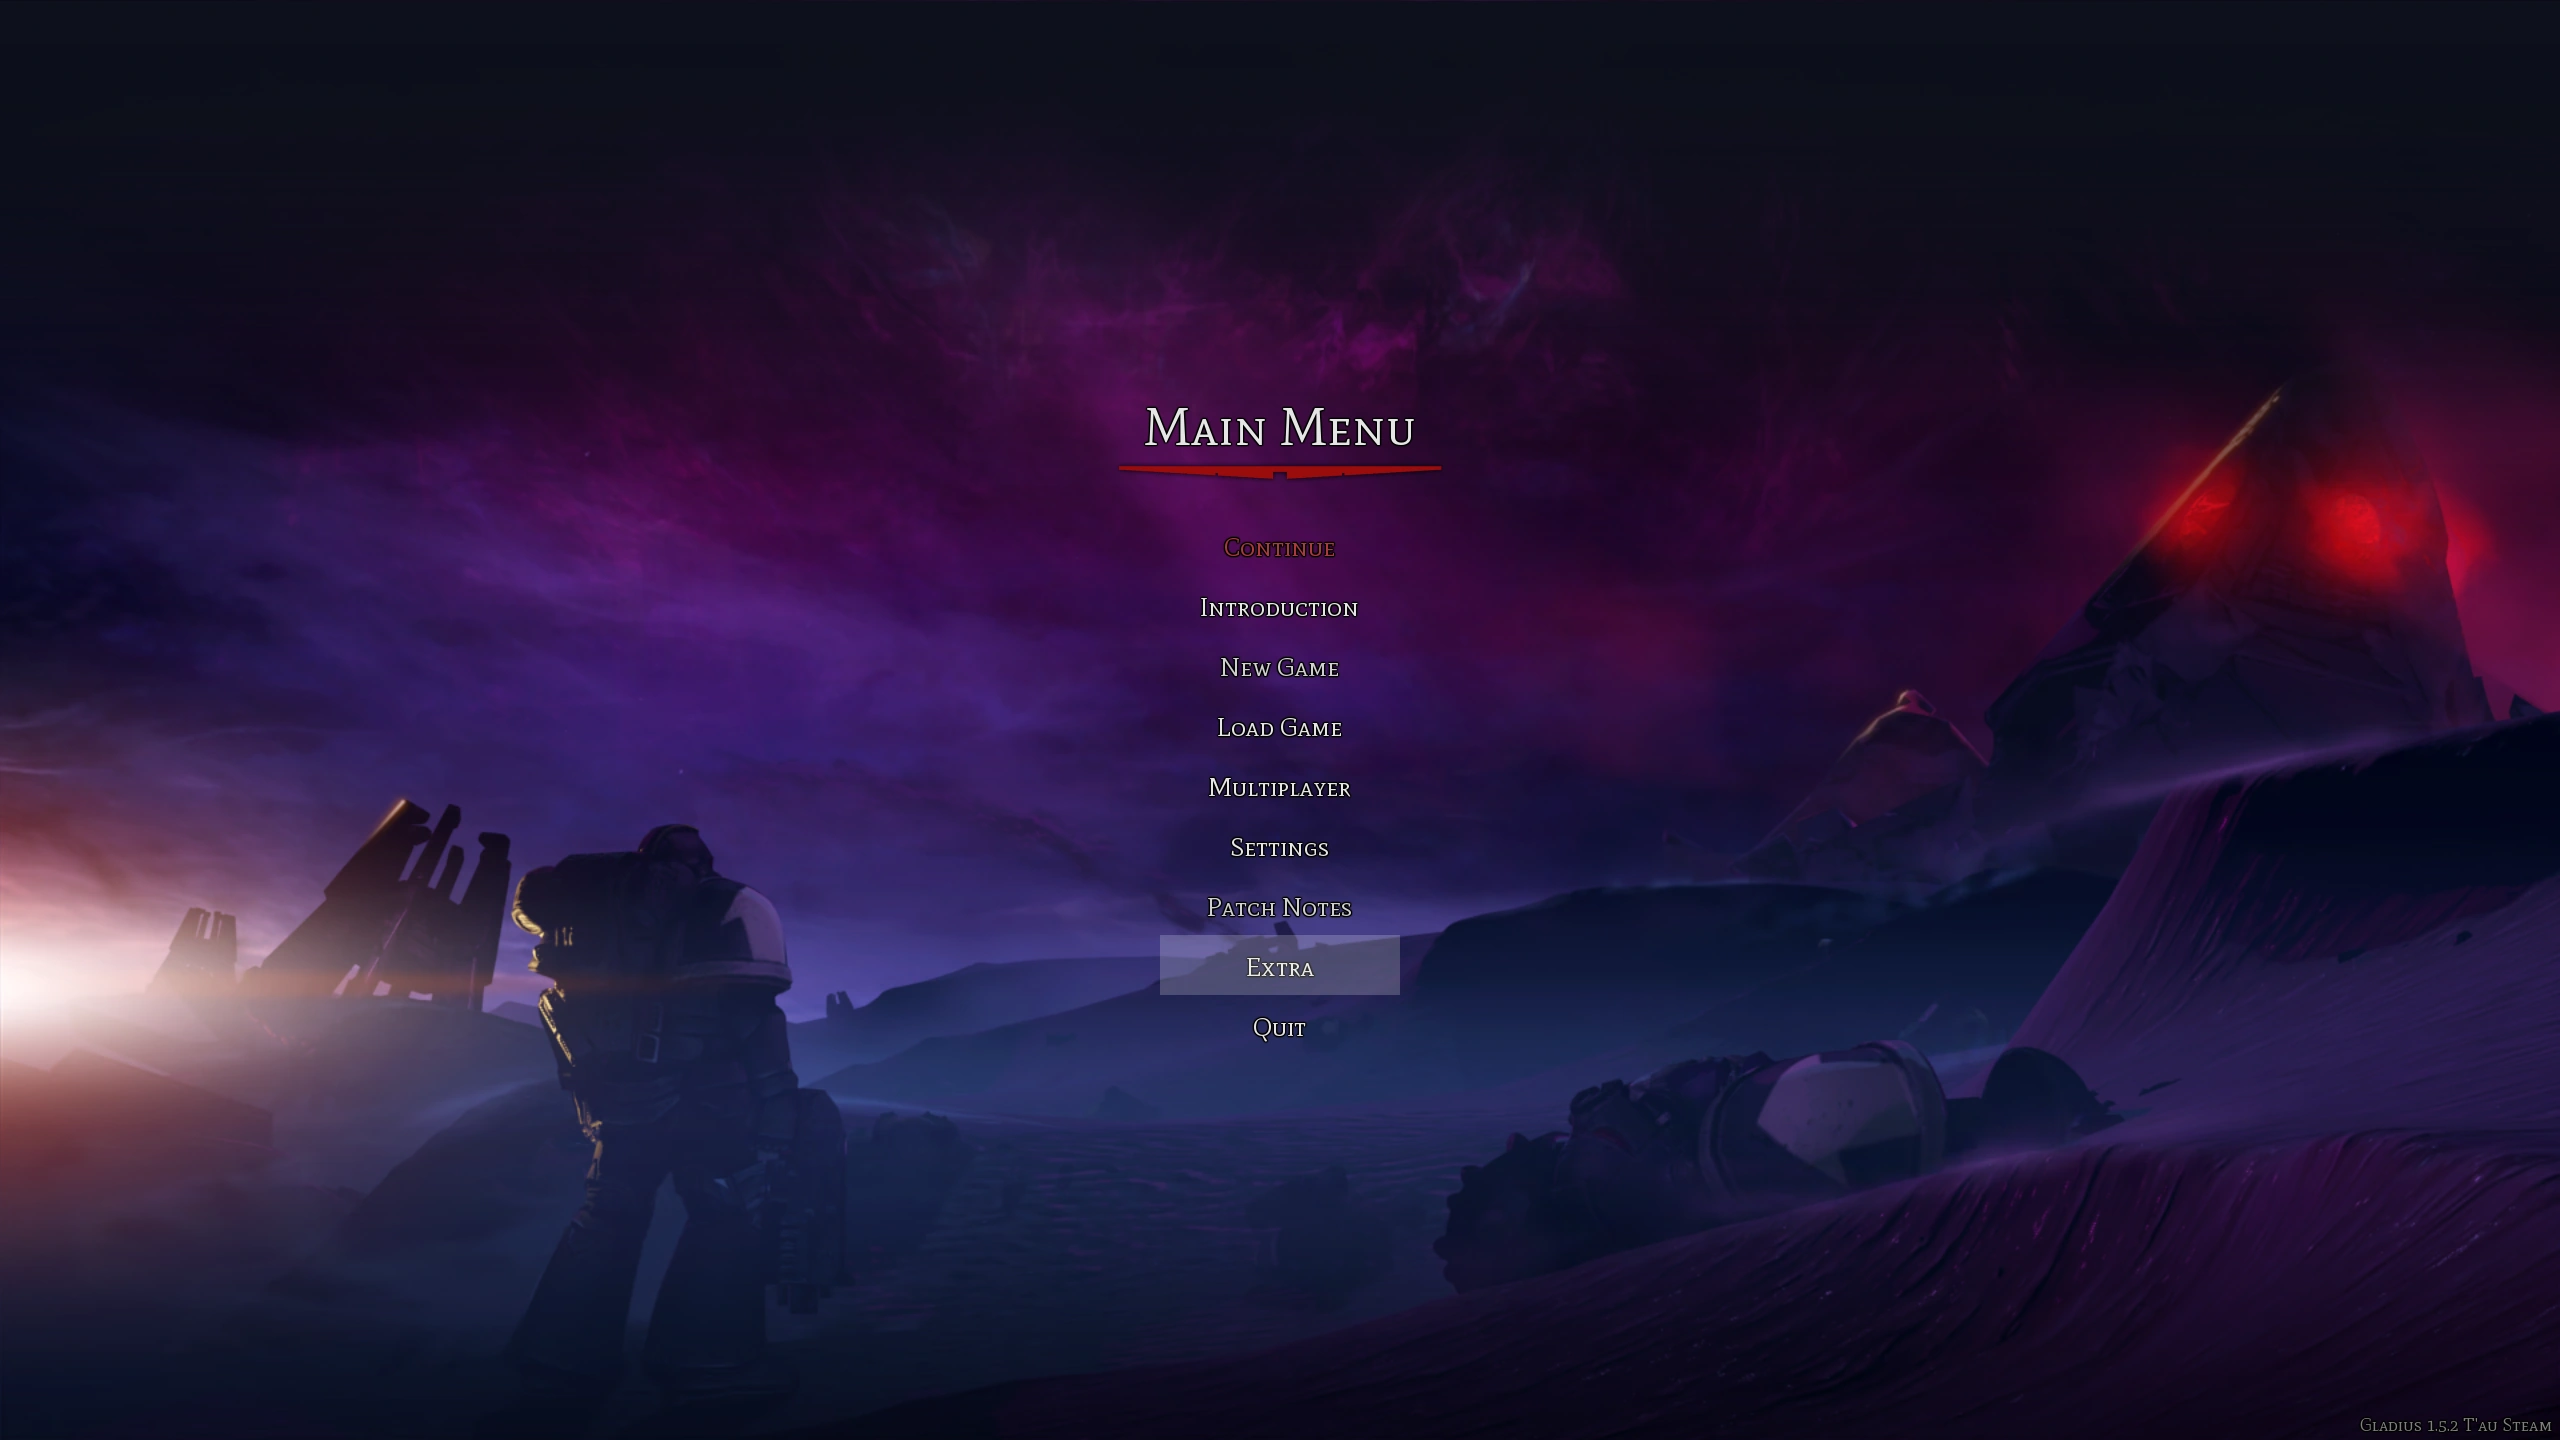
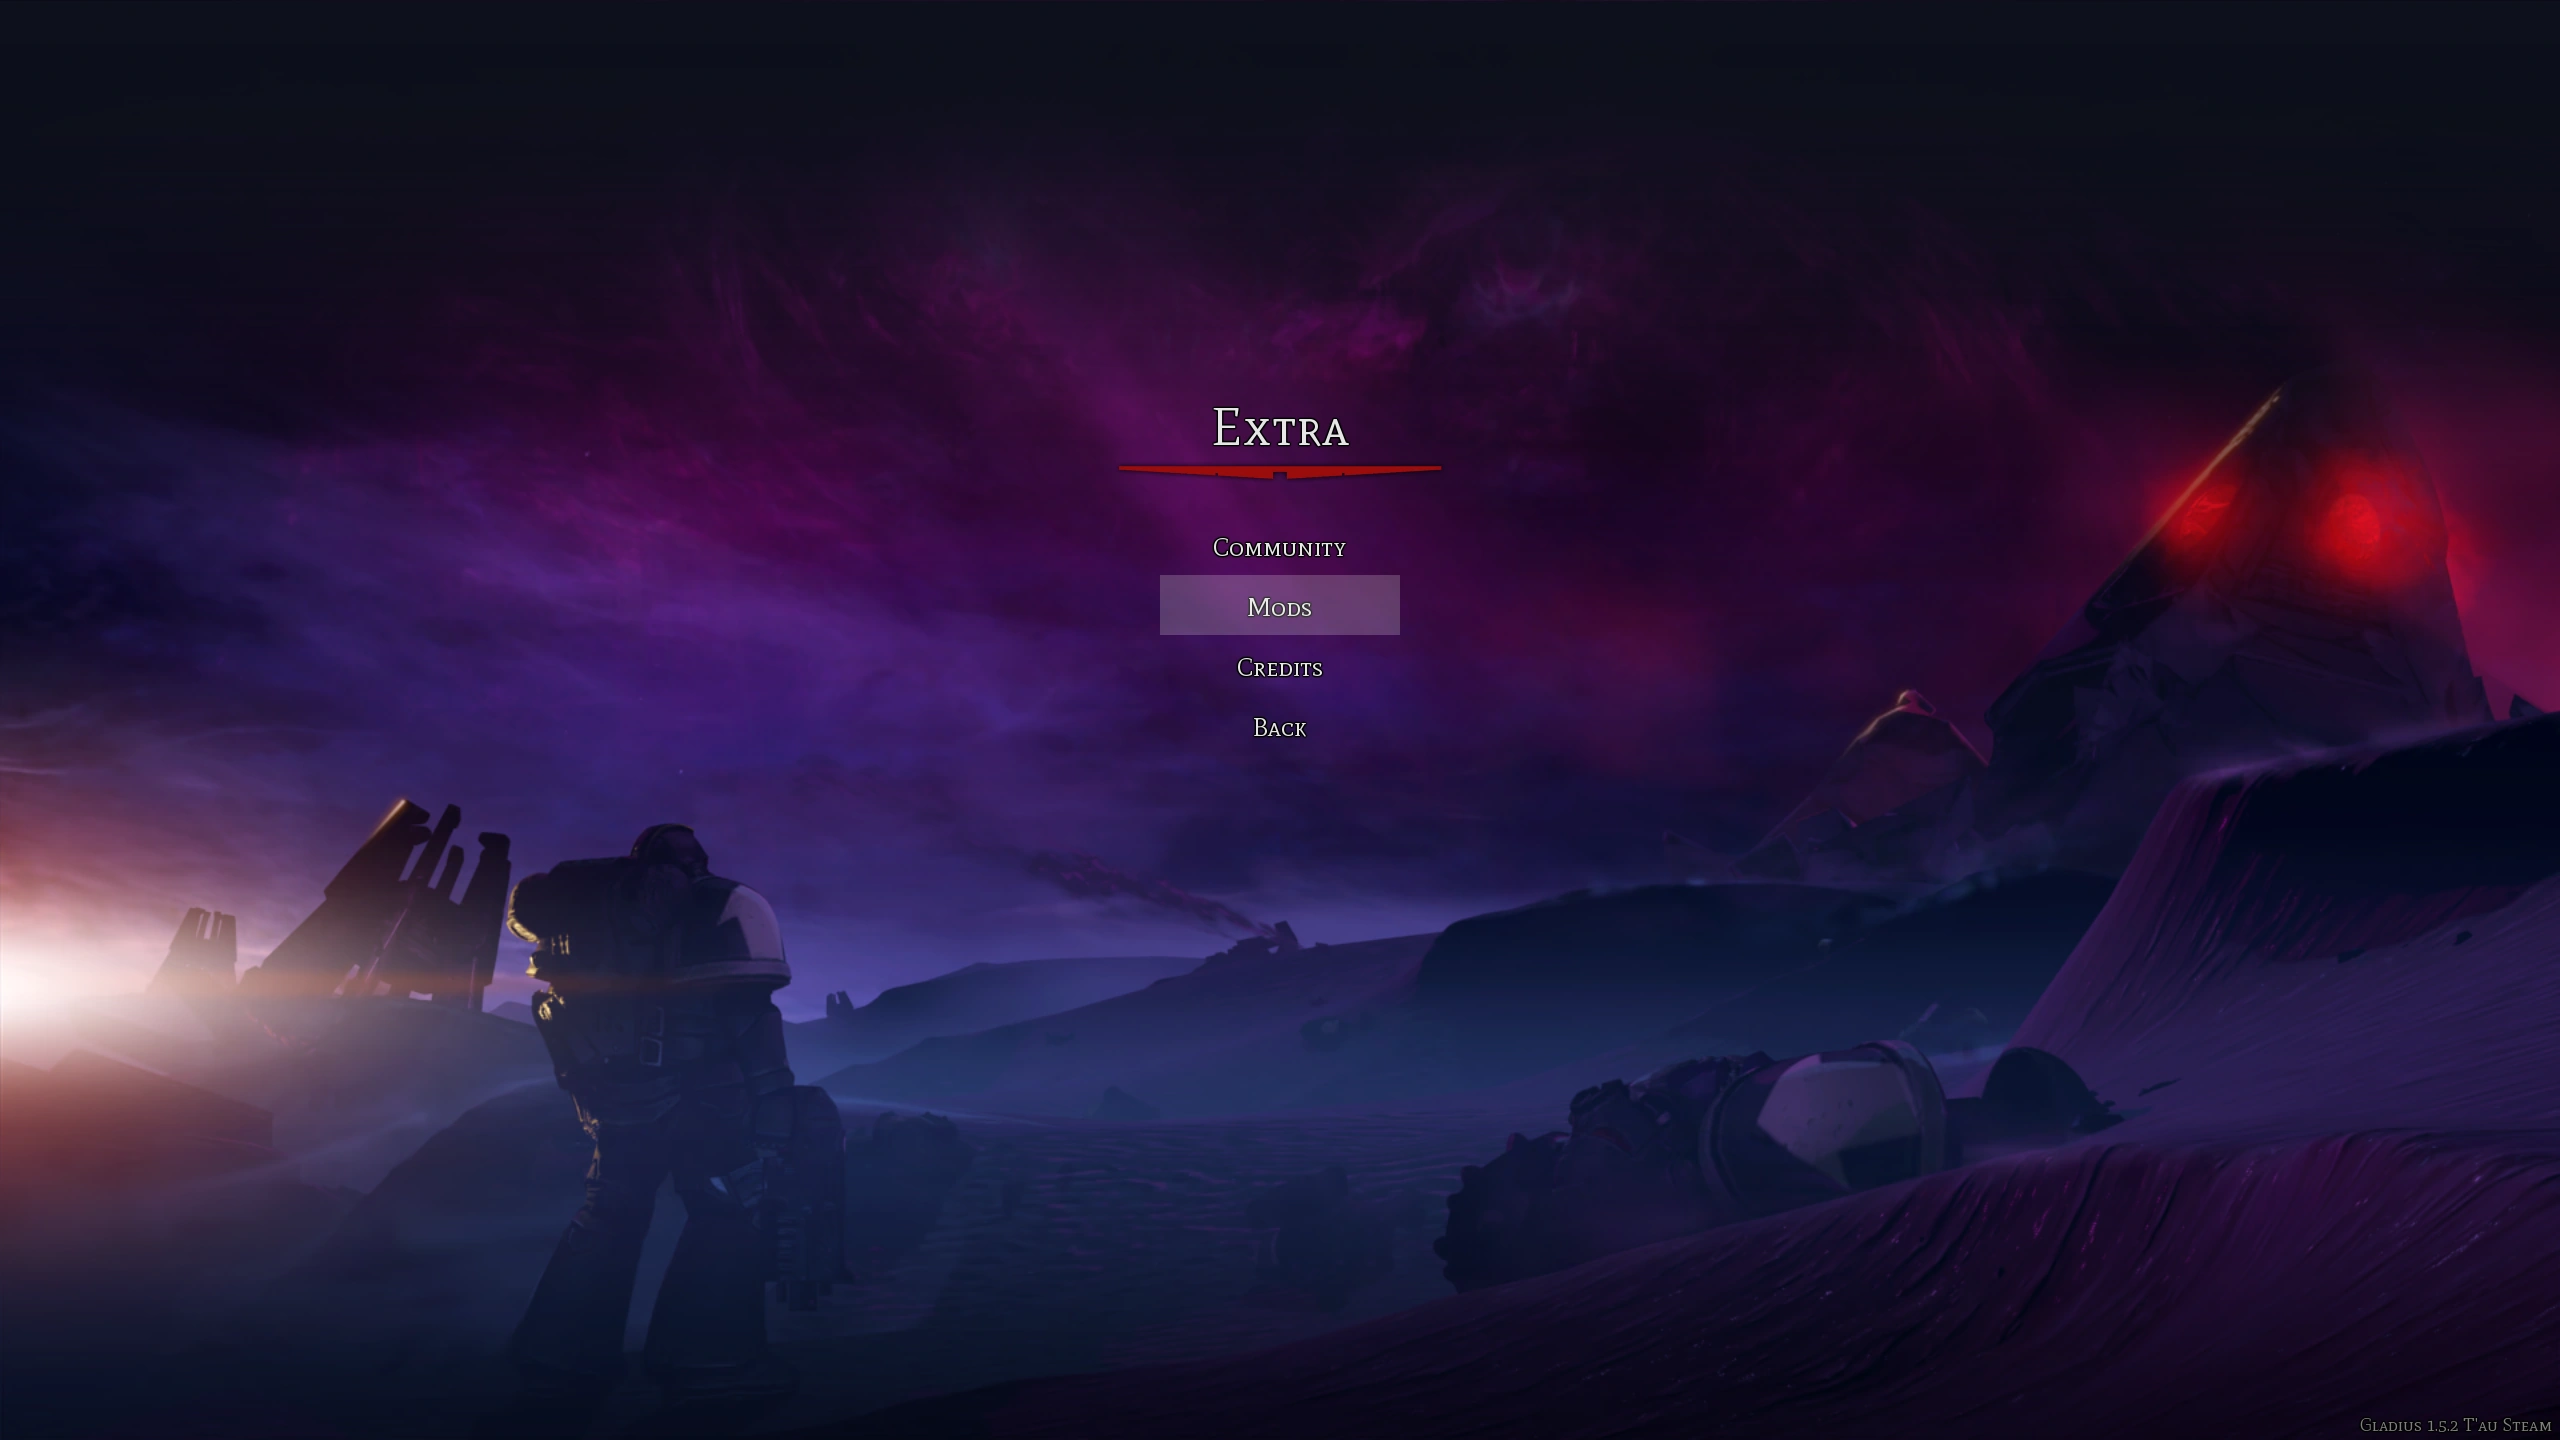
Login to Steam and Launch Gladius. From the main menu, navigate to Extra → Mods:
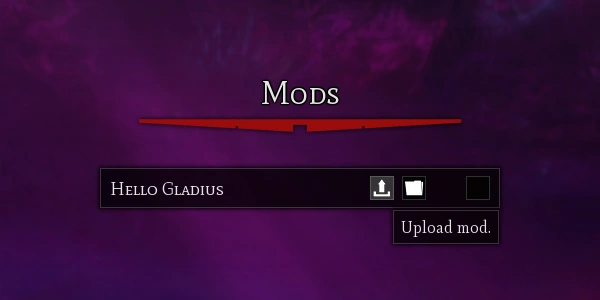
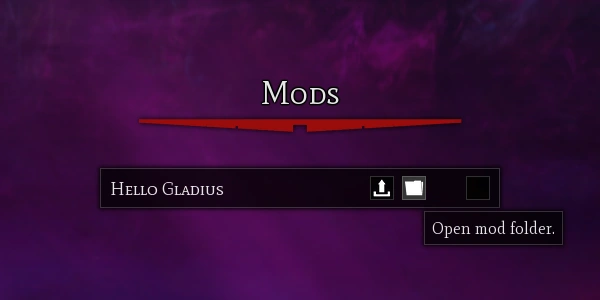
If the mod is placed in the correct location in Step 1, then you should see it listed in the Mods menu:
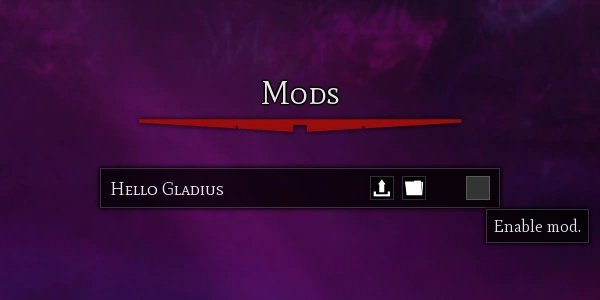
A mod that has not yet been uploaded to the Steam Workshop will have 2 icons for its entry:
UploadClicking this icon will begin the upload process to the Steam Workshop. (REMOVED)
OpenClicking this icon will open up a file browser window for your operating system and show you the mod folder on the computer.
EnableClicking this icon will enable/disable the mod within the game.
Uploading to the Steam Workshop[ | ]
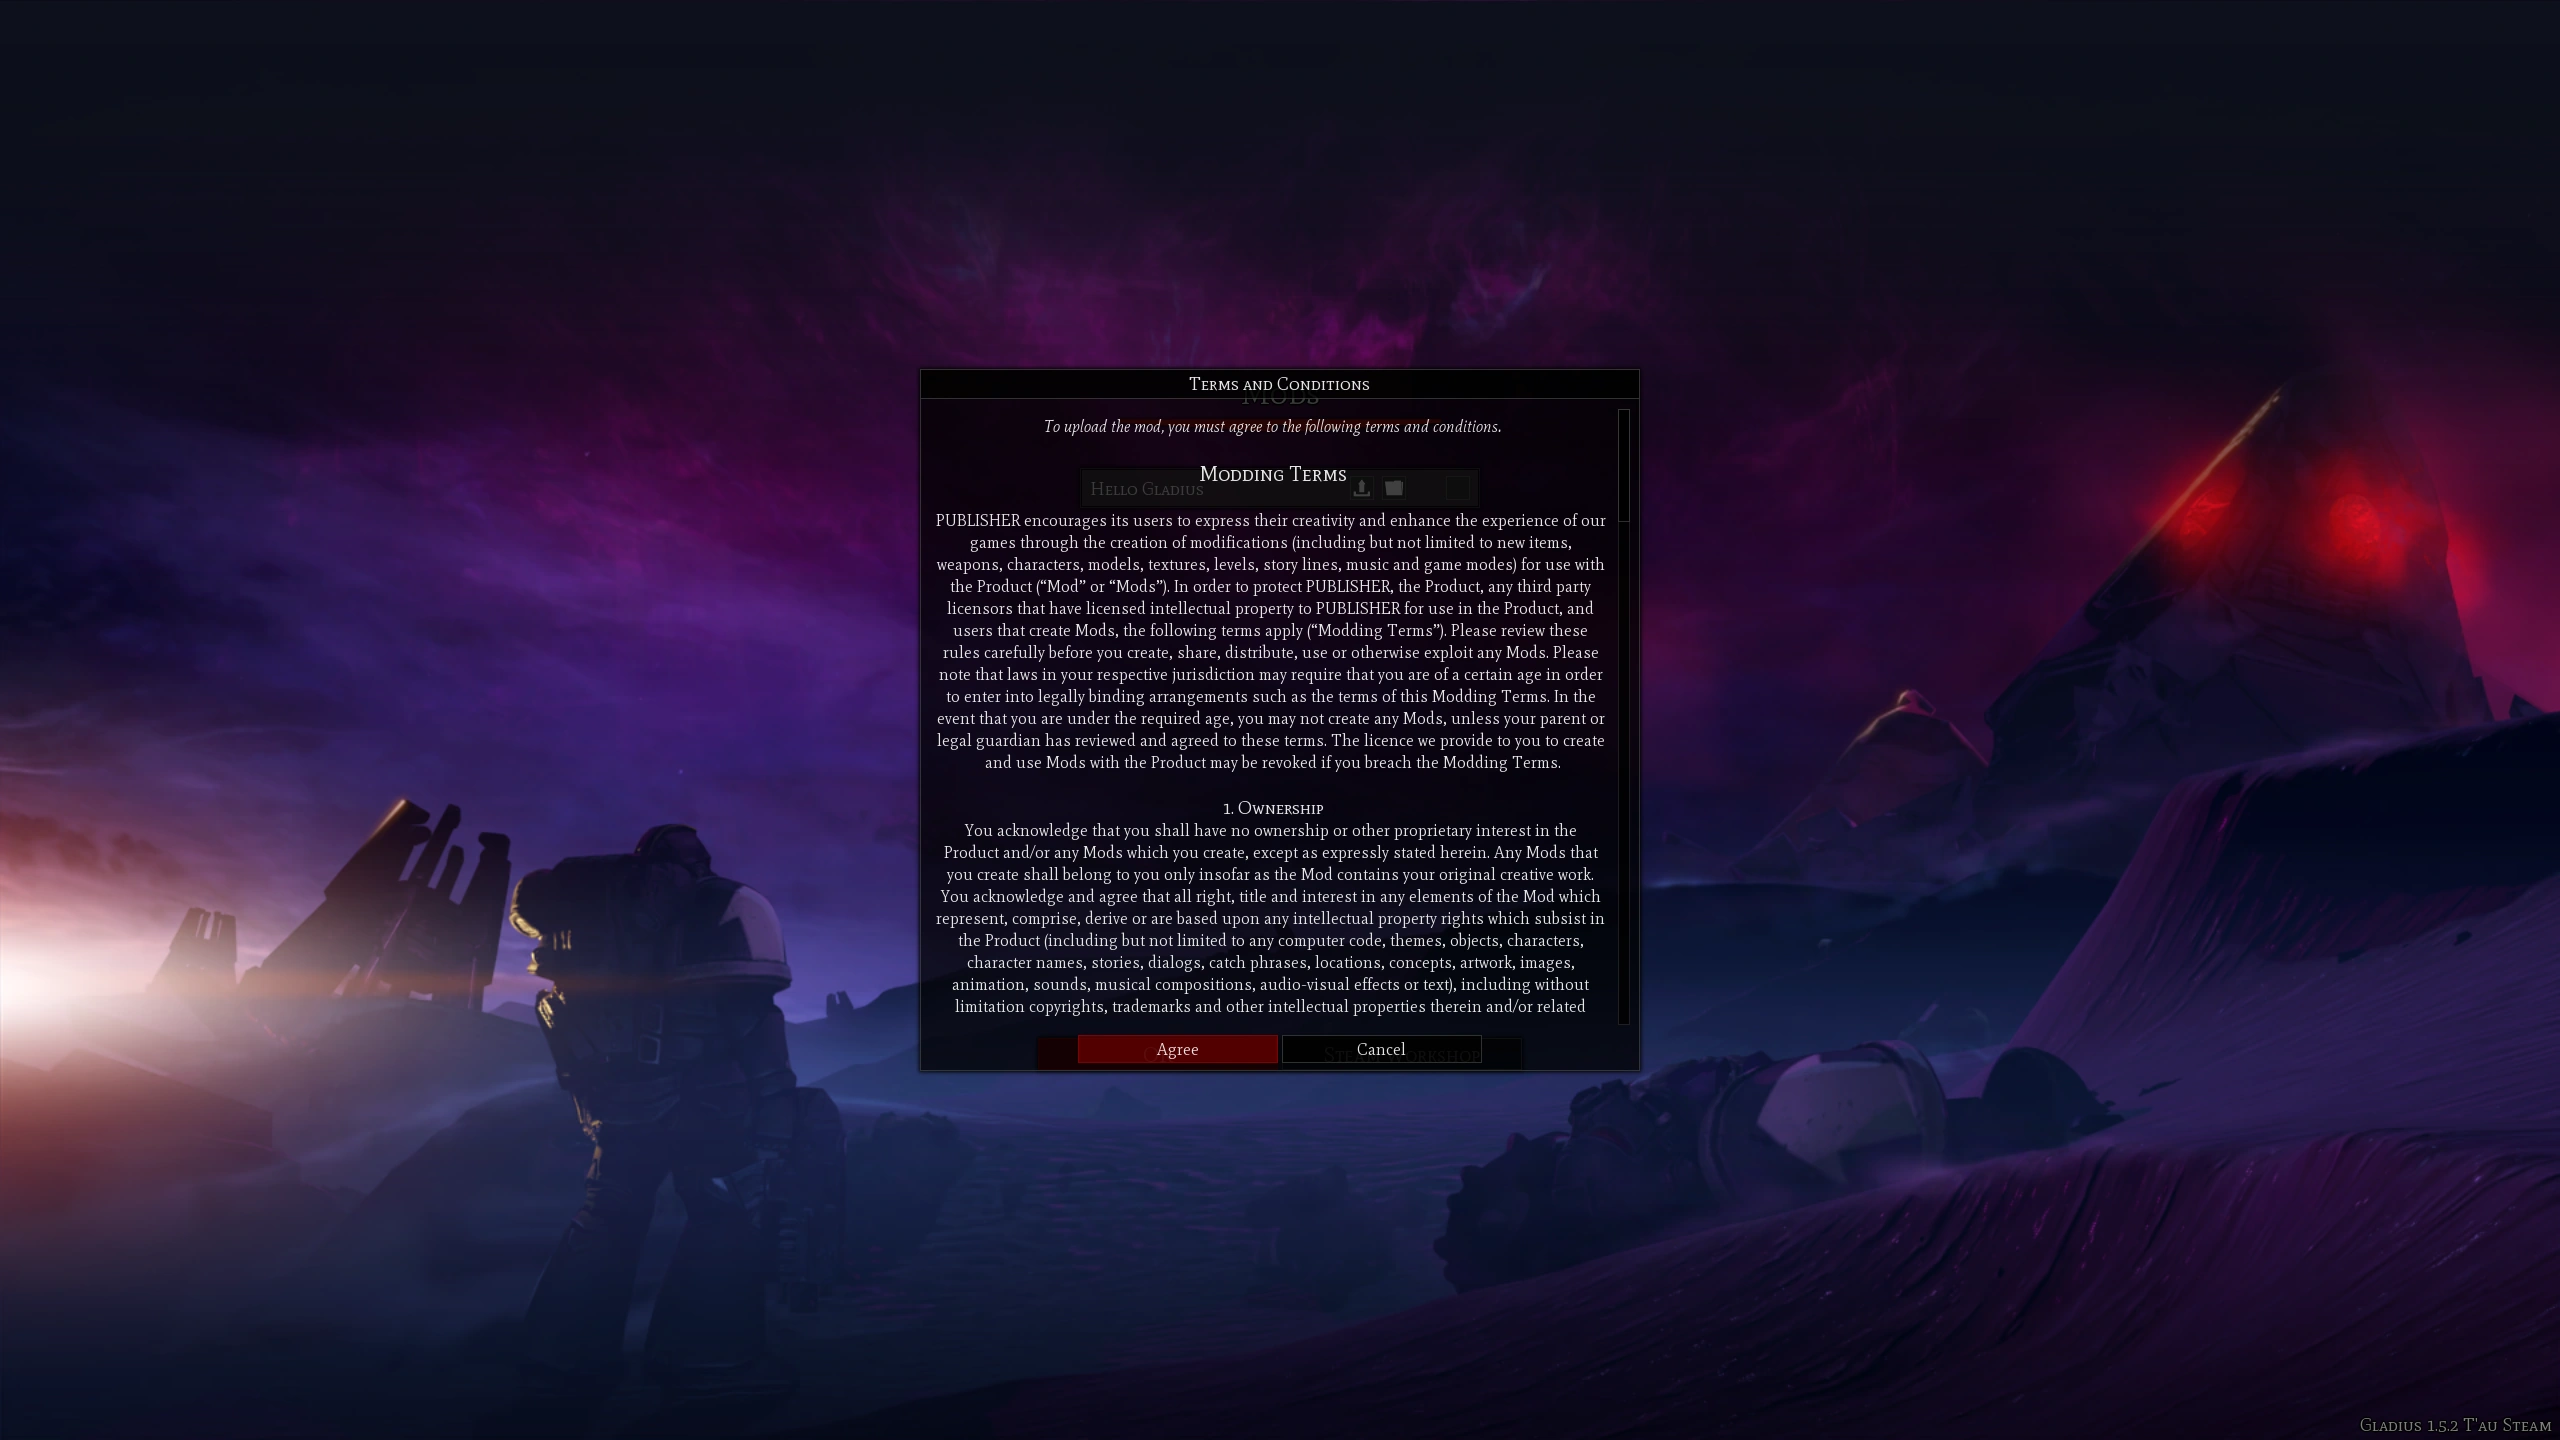
Click on the Upload button in Step 2. A window will appear asking you to accept the publishing terms:
You must agree to these terms if you want your mod to be uploaded to the Steam Workshop.(Feature removed)
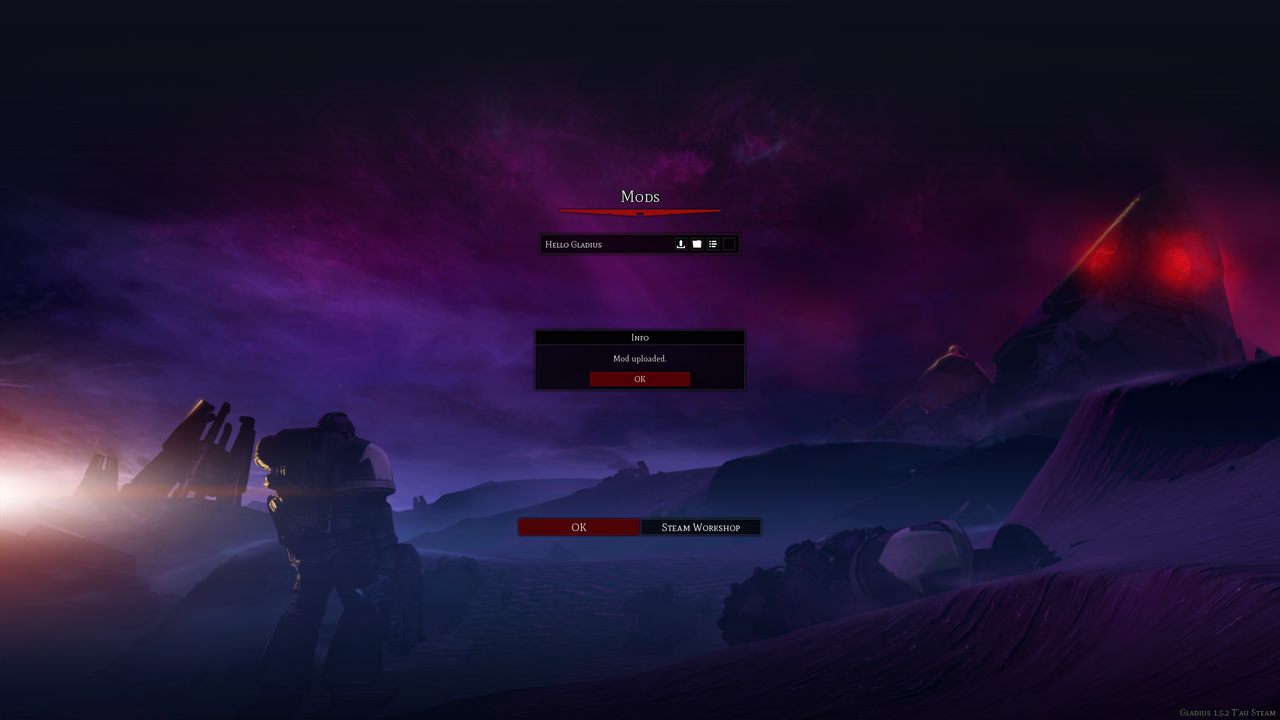
Once you accept the terms and click the Agree button, the mod will start uploading. A successful upload to the Steam Workshop will display a prompt saying the mod was uploaded:
An addition icon will now appear in the mod listing:
Details Click this icon to open your Steam browser to the Steam Workshop page for the mod. You can now enter in information about the mod on the Steam Workshop and upload any additional media to showcase the mod.
After the mod has been successfully published to the Steam Workshop, the mod directory will now contain a file called SteamID.txt:
This file is the unique Steam Workshop URL corresponding to the mod.
Any changes / updates to the mod, simply re-upload using the Upload icon as before.
Errors[ | ]
Here are some common errors you might encounter when attempting to upload the mod:
k_EResultFail - Generic failure.
k_EResultInvalidParam - Either the provided app ID is invalid or doesn't match the consumer app ID of the item or, you have not enabled ISteamUGC for the provided app ID on the Steam Workshop Configuration App Admin page. The preview file is smaller than 16 bytes.
k_EResultAccessDenied - The user doesn't own a license for the provided app ID.
k_EResultFileNotFound - Failed to get the workshop info for the item or failed to read the preview file.
k_EResultLockingFailed - Failed to aquire UGC Lock.
k_EResultFileNotFound - The provided content folder is not valid.
k_EResultLimitExceeded - The preview image is too large, it must be less than 1 Megabyte; or there is not enough space available on the users Steam Cloud.
known and removed, tested Feature has been removed. no longer able to upload to Steam workshop.
General Modding[ | ]
Practically every aspect of Gladius - Relics of War is moddable; only modifying the game logic remains inaccessible.
- References to game directories like \Data, \Resources, etc. are shorthand for
\Warhammer 40000 Gladius - Relics of War\Data;
\Warhammer 40000 Gladius - Relics of War\Resources;
etc.
where \Warhammer 40000 Gladius - Relics of War is the top-level game installation directory.
- For brevity, the wiki uses the Windows backslash \ notation with regards to directory identification. Linux users should readily replace the backslash with a forward slash /.
Mod Location[ | ]
As of patch 1.08, the game uses non-destructive modding (i.e., core files are not modified). In order for the game to load mods, they must be placed in:
replacing <mod name> with the name of the actual mod. Any mod files meant to replace their original counterparts must be named and placed in the correct directory hierarchy (detailed below) in order to be flagged as such by the engine.
The \Data Structure[ | ]
All of the game's assets are located under \Warhammer 40000 Gladius - Relics of War\Data:
\Data\Audio: sound and music.
\Data\Cinematics: cut-scenes.
\Data\Core: in-game text and language translations.
\Data\GUI: user interface.
\Data\Scene: camera management.
\Data\Video: icons, textures, meshes, animations, fonts, and sprites.
Data\World: specific information on units, buildings, factions, weapons, and upgrades.
Rather than further enumerate individually all of the numerous sub-directories, the location of specific remaining content is best absorbed through particular modding ventures. For example, when creating a new "unit", that respective section of the modding guide will elaborate all the necessary files required under \Audio, \Video, \World, etc.
Log Files & Crashes[ | ]
As with any general modding venture, there will often be times where changes will lead to a game crash. To help diagnose the source of the error, in addition to an on-screen error prompt, the game writes an error log to:
Consulting this log file is an excellent place to help narrow down the source of the error.
the game will automatically "update" after a crash and re-download/verify core game files then it will auto disable all mods after a crash on next reboot.
Some general crash issues:
Missing elements in \Data\Core and \Data\World usually cause a crash on game startup.
Missing elements in \Data\Video usually cause a crash with "Visual C++ runtime error".
Click on "New Game". Crashes here are mostly due if you missed adding faction base images to new factions, or changed WorldParameters.xml
Launch this new game. Crashes here occur for missing cutscenes in Data\Video, missing starting city or units, but also other reasons.
Settle a new city.' Crashes here occur of you forgot to add a base city for your faction.
Once you test a game where you can settle a city, also remember to check the Compendium and Research features and see if they do not crash.
Crashes when clicking on Research mean you have bad references in Data\World\Upgrades and Data\Core files, or just missing icons in Data\Video, or that you added a research that does not have enough researches leading to that tier.
Crashes when clicking on Compendium mean you forgot to add flavor or description to some elements in Data\Core.
XML Programming[ | ]
Every aspect of the game outside of the engine is defined using XML. The difficulty posed to the modder is not XML per se, but rather the general game framework built using XML. In other words, Gladius XML. The engine recognizes certain predefined XML code structure that modders need to adhere to. Opening up an .xml file and changing a value or following a pattern to add to the existing code is trivial. Going through such an example is illustrated at the end of this page. Getting the engine to work with custom XML tags is the tricky part. In this section we give an example of a more intricate nature showcasing how the general Gladius XML framework is structured.
For this example we will consider a simple modification to the colour of the Menu button in the top-right corner of the world GUI. This button is defined using the following code:
Specifically, we are interested in the third-last line <button name="menuButton" ... />. This tells us that the Menu button style is defined as <button>. Now, the definition for <button> is:
From this we see that the original texture used for a <button> is \Data\Video\Textures\GUI\Button.dds. We can proceed by either 1) changing what Button.dds looks like, 2) create a new image, for example, NewButton.dds, and set pressedTexture="GUI/NewButton", or 3) modify TopBar.xml. The modder is encouraged to try the first two approaches and see that they are inadequate solutions. The underlying image used by <button> is system-wide, so aspects of the UI that the modder never intended to change will, in fact, change. Therefore, we are left with implementing a Gladius XML solution.
The engine expects TopBar.xml to pass to it <button>. If the modder attempts to create a new custom XML tag, for example, <menuButton>, then the game will crash. However, the problem is not where to define it, but rather how to define it. There is no getting around the fact that <button> is a construct defined directly in the engine. Therefore, the modder is not going to be successful in trying to create a new construct that the engine does not inherently understand. What the modder can do is modify which <button> will be loaded:
So what we did was define a new XML tag <menuButton> that has the exactly same structure as <button>. Now, in TopBar.xml, we can reference this new button by the type attribute:
The above example demonstrates that XML in-and-of-itself is insufficient beyond superficial manipulation of existing values. Advanced modding relies on understanding the underlying Gladius XML framework.
Modifiers[ | ]
When creating or modifying units, buildings, traits, weapons, etc, modifiers are very important to know about. More information about their structure, lists of their components and explanations of their effects can be found in the modifiers page.
General Notes about Image Editing[ | ]
All images (apart from fonts) use the DDS file format. The freely-available Paint.NET program (https://www.getpaint.net/download.html) is an easy and convenient way to work with DDS images.
The trickiest part in getting images to work in Gladius - Relics of War is to make sure to have the correct export settings for the DDS format. The export settings will appear only after first saving the file in Paint.NET. Use the following export settings:
- DXT3 (Explicit Alpha)
- Cluster fit (Slow/HQ)
- Perceptual
- Generate Mip Maps
- Fant
The only other thing to keep in mind while working with images in Paint.NET is to set an appropriate Opacity-Alpha value (which is accessible from the Colors palette -> More). Setting this value correctly might require some trial and error, especially if it's an image to which the game applies it's own additional filters.
Or for GIMP to export to DDS. under (Compression) use the BC 2 /DXT3 and in the (Mipmaps) select Generate mipmaps (at this time its is believed that no other options need be changed.)
Dev-Provided Modding Resources[ | ]
The development team at Proxy Studios has provided the community with official tools that can be used for modding. These are the same tools used in-house by the studio when creating game assets. Anyone who bought the game, automatically gets access to the tools:
\Resources\3dsMax. Exporting scripts from 3ds Max for animations, meshes, vegetation, and scenes.
\Resources\Scripts\ConvertFromWarhammerSpec.py. Python script to automatically convert 7e Codex values to in-game units.
A Simple Example Mod[ | ]
By editing \Data\World\Blueprints\WorldParameters.xml you can add an option for larger maps. The original file contains the following code:
Now we must also locate the string reference, otherwise the game will crash. We do this by modifying \Data\Core\Languages\<...your language...>\WorldParameters.xml. The original file contains the following code:
where the ... represent other code in the file but not directly pertinent for our mod. We want two follow the same structure as the above code and add two new lines at the end:
<language>
	...
	<entry name="Size" value="World Size"/>
	<entry name="Size0" value="Tiny"/>
	<entry name="Size0Hint" value="%1%: Recommended for 2 players."/>
	<entry name="Size1" value="Small"/>
	<entry name="Size1Hint" value="%1%: Recommended for 3 players."/>
	<entry name="Size2" value="Medium"/>
	<entry name="Size2Hint" value="%1%: Recommended for 4 players."/>
	<entry name="Size3" value="Large"/>
	<entry name="Size3Hint" value="%1%: Recommended for 6 players."/>
	<entry name="Size4" value="Huge"/>
	<entry name="Size4Hint" value="%1%: Recommended for 8 players."/>
	<entry name="Size5" value="Gigantic"/>
	<entry name="Size5Hint" value="%1%: Recommended for 16 players or more."/>
</language>
We now make sure that the above files are placed in the correct mod location under a suitable mod name and... tada! We just allowed for an epic map size!


